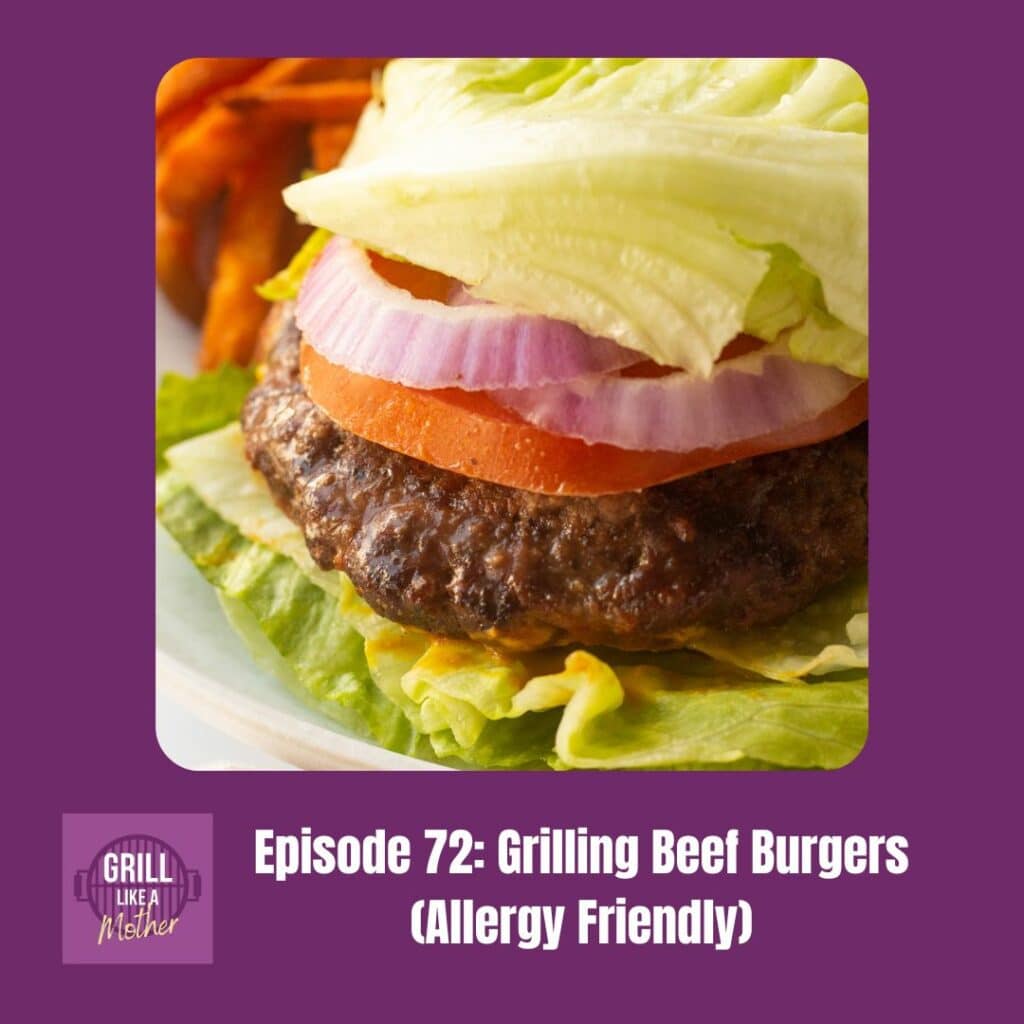
In episode 72, host Taryn Solie teaches you how to make a super tasty beef burger recipe that caters to food allergies and paleo diets. With some unique and flavorful ingredients, these burgers deliver on taste. Taryn shares burger tips and tricks, as well easy-to-follow steps for forming perfect patties, and keeping your burger from drying out. Whether you have dietary restrictions or simply love a great burger, this episode will inspire you to elevate your burger game!
Listen on iTunes, Stitcher, TuneIn, or your favorite podcast player. Or scroll down to read a full transcript.
RECIPES MENTIONED
These are some of the recipes mentioned in the episode, all of which are on Hot Pan Kitchen.
RESOURCES MENTIONED
Some of the following are affiliate links. As an Amazon Associate, I earn from qualifying purchases.
We LOVE our Thermoworks Thermapen ONE meat thermometer to quickly and easily check the internal temperatures of meats. We’ve used a Thermapen for years and they are AMAZING. Get one for yourself here (affiliate link).
- Episode 15: How to grill burgers with Amy Nash
- Coconut aminos
- Fish sauce
- Diamond Crystal kosher salt
- Small food processor
- Wax paper
- Grilling spatula
TRANSCRIPT
Taryn Solie: Hello grillers, and thank you for tuning in today! I am your host, Taryn Solie, and I am here to talk with you about all things grilling and outdoor cooking, including delicious recipes and handy tips and tricks, all to give you some grilling inspiration.
Today we’re talking about one of the most classic grilled foods, which is hamburgers. Now I already have a super informative episode, number 15 with Amy Nash from House of Nash Eats, that has a ton of tips for grilling burgers. I’ll reference some of those tips in this episode, but if you want all the details definitely go back and have a listen to that one.
For this episode we’re actually going to be talking about a specific type of hamburger, and it’s one that works for people with certain food allergies, specifically those who are gluten free, soy free, and dairy free (or those who follow a paleo diet). But don’t be discouraged or turned off if you don’t have food allergies because neither do my kids or husband and this is one of their favorite burgers! The burgers are juicy and flavorful and really work for everyone.
Let’s get right into it with the ingredients you’ll need. Go ahead and grab:
- 3 oz of mushrooms – I like to use shiitake mushrooms,
- ¼ tsp of oil (to saute the mushrooms),
- ½ tsp of garlic powder,
- ½ tbsp of coconut aminos,
- 1 tsp of fish sauce,
- 1 tsp of Diamond Crystal kosher salt,
- 2 tbsp of fine almond flour,
- 1 tbsp of mayo,
- 1 lb of ground beef,
- whatever toppings you like – lettuce, tomato, pickles, ketchup, mustard, etc., and
- a bun or wrap of some sort – if you’re gluten free or paleo just make it’s a gluten free or paleo bun, or you can wrap the burger in lettuce.
Now you may be thinking – “mushrooms? fish sauce? in a burger?” but those are the items that really lend this burger a lot of flavor. And it doesn’t come out tasting fishy at all, just salty and delicious. So with that, a couple of notes about these ingredients:
- you may not even recognize some of them if you don’t often cook gluten free or paleo, particularly the coconut aminos and the fish sauce. I am able to find both of these in the Asian food section of my local grocery stores, but I also live in the Seattle area which has a large Asian population. If you live in an area where your local grocery store doesn’t carry these items you can easily get them off Amazon, and I’ll provide links to them on the show notes page.
- for the mushrooms as I mentioned I typically use shiitake mushrooms as I think they have a great flavor in the burgers. You could definitely also use oyster mushrooms, or if you can’t find either of those I would suggest using baby bella mushrooms. I would not use white mushrooms as they don’t lend the same amount of flavor as the other types I’ve mentioned.
- about the salt, this recipe specifically uses Diamond Crystal kosher salt, which is my preferred salt for grilling and cooking. This is because it’s less salty by volume than other salts, which leaves more room for error when salting your food. If you’re using a different type of salt, you’ll want to adjust the measurement a bit and I’ll link to a resource on the show notes page for that.
- then lastly about the ground beef. I typically make this recipe with beef that has a meat to fat ratio of 85/15, meaning it’s 15% fat. This is what helps make the burger juicy, and some of the fat will drip out of the burger when it’s on the grill. If you’re using a leaner cut of ground beef you may want to add more mayo to help keep the burger moist.
Okay, let’s get to the recipe!
First up you want to dice then saute the mushrooms. Place a medium sized saute pan on a stovetop burner over medium heat and add the oil in it to warm up. Remove the stems of the mushrooms (keeping them in a plastic bag in the freezer to use for making your own broth if you do that) and place the caps in a small food processor. Pulse them until they’re finely chopped, then add the minced mushrooms to the pan with the oil. Stir them with a spatula and cook until the mushrooms are soft, about 5 minutes.
While the mushrooms are cooking, take out a medium sized bowl to make the burger patty mixture in. Use measuring spoons to measure out the garlic powder, almond flour, kosher salt, coconut aminos, fish sauce, and mayo and add them all into the bowl. Use a small whisk to thoroughly mix everything together and set the bowl aside.
When the mushrooms are done cooking, remove them from the heat to let them cool for 3 or 4 minutes, then pour them into the mixing bowl with the mayo mixture. Remove the ground beef from it’s packaging and add it to the bowl as well, using your hands to combine everything together. You don’t want to work the meat too hard as it will make it spongey when you cook up your burgers, but you want to make sure the mushrooms and other seasonings are fully incorporated with the ground beef.
Separate the beef mixture into four equal portions in the bowl, then wash your hands and take out a sheet pan or platter that’s big enough to fit all four hamburgers on it. Place 4 pieces of wax or parchment paper big enough to fit a single patty on each and set them onto the sheet pan. Take one portion of the meat mixture in your hands and roll it into a ball, then gently start flattening it with your fingers, working your way around the sides and pressing where needed to get a round shape. You want to make your patty roughly ¼ inch thick, then place it on one of the pieces of wax paper and repeat the process with the other three portions of meat.
At this point you can add a small indentation into the center of each patty with your thumb, though I will admit that I don’t often do this. My burgers don’t tend to shrink or puff up in the middle as I know sometimes happens. I think this is because the ground beef that I use comes in a square block that’s sealed, so it’s very tightly packed. If you’re using loose ground beef, like what you would get from behind a meat counter, your burger may be more likely to puff up. If you find this happens often with your burgers, or you just want to be cautious, then go ahead and put an indent in the center of your burger patties, only an eighth of an inch or so down. Then wash your hands when you’re done.
Once all the patties are formed, heat up your grill to between 400F and 425F. Pick the patties up by the paper and flip them over onto the grill, discarding the paper afterward. Close the lid and cook for 4 minutes, then open the lid and use a spatula to flip the burgers over onto the other side.
A quick note here – resist the urge to press down on the burgers with your spatula! This leaks all the juices out and gives you drier burgers, which nobody wants. Simply flip your burgers then close the lid and let them cook for another 4 minutes.
At this point you want to check the internal temperature of the burgers to make sure they’re done – if you don’t have a meat thermometer I’ll provide a link to the one we use and love on the show notes page. Remove the hamburgers from the grill once they reach an internal temperature of 160F. Let them rest for 5 minutes then serve them wrapped in lettuce or on a bun and with whatever toppings you like!
Now I probably don’t need to tell you what to eat with a hamburger as it’s such a commonly grilled food, but I will tell you some of the foods my family likes to eat with these burgers. Of course fries and tater tots are the classic pairing, but if it’s hot out and you don’t want to turn on your oven I like to make potato salad – I have a killer potato salad with bacon that I’ll link to on the show notes page. My family also likes coleslaw with our burgers – not on top, but on the side – though you could put it on top if you wanted! Then there are a ton of other options that involve no cooking at all, like potato chips, chopped veggies, or some cut up fruit.
I’ll include a link to the full printable recipe for these burgers, as well as the other recipes and resources I’ve mentioned, on the show notes page. To get to it you can either go to my main website at Hot Pan Kitchen dot com and click on podcast in the main menu, or you can click on the link provided in whatever podcast app you’re listening on.
If you enjoyed this recipe, consider subscribing to the show on your favorite podcast platform so you don’t miss out on future episodes! I’ve got so many more great grilling and smoking recipes you’re going to love.
That’s it for today, thank you so much for listening, and until next time, keep grilling like a mother.

Leave a comment