Episode 046 is the second in a series all about turkey! Taryn will be going over how to smoke a turkey from start to finish, including what to do with the leftovers. This second episode in the series is about how to dry brine a turkey. Listen in to hear why you definitely want to consider dry brining your Thanksgiving turkey, plus lots of helpful tips!
Listen on iTunes, Stitcher, TuneIn, or your favorite podcast player. Or scroll down to read a full transcript.
RESOURCES MENTIONED
Some of the following are affiliate links. As an Amazon Associate, I earn from qualifying purchases.
TRANSCRIPT
Taryn Solie: Hello grillers, and thank you for tuning in today! I am your host, Taryn Solie, and I am here to give you some grilling inspiration. Typically I go over one recipe in detail per episode, but today is a little different – it’s the second in a series I’m doing on smoking a turkey. I will still be going over directions and helpful tips, but it’s more of a how-to than previous episodes.
In episode number 45 I went over how to spatchcock a turkey, which just means you remove the back bone and lay it flat for cooking. This helps it cook faster and more evenly.
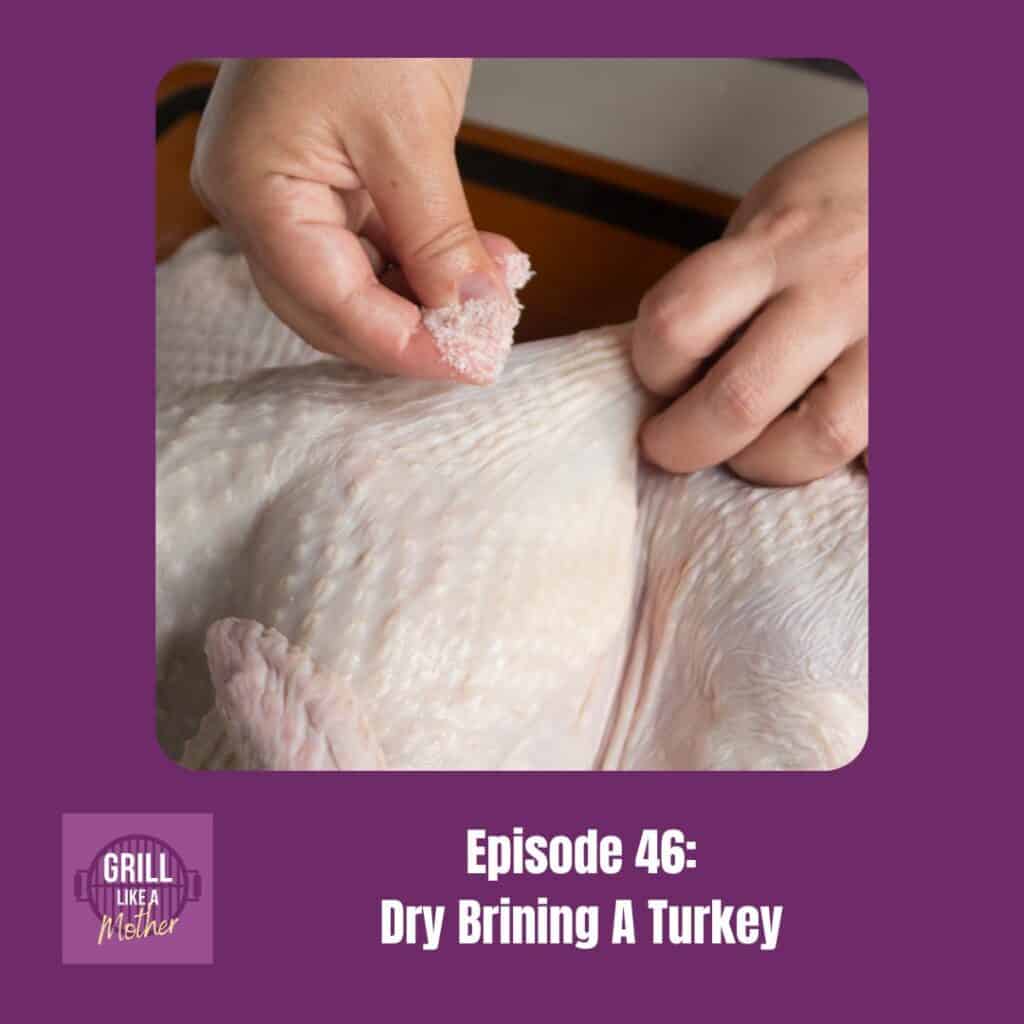
In today’s episode I’m going to go over the next step in the process, which is how to dry brine your turkey. Before we get into the instructions, I want to talk a little about what dry brining is and why you should do it.
Dry brining is where you rub salt onto your turkey (or other meat) and let it sit to soak in the salt for flavor. What actually happens is the salt draws the moisture out of the turkey, the moisture mixes with the salt and forms a brine that then gets absorbed back into the meat itself. The salt affects the proteins in the meat so when you go to cook the turkey, the meat stays juicier and is more flavorful.
Now you can also do a wet brine, where you let the turkey soak in a water and salt solution for a period of time, but I find dry brining to be much easier and less messy. Also, with wet brining, your turkey holds on to the water that’s in the brine solution, which might make it juicy but not as flavorful as just absorbing salt without the added water.
I’m going to provide a link in the show notes page to an article that explains the science behind dry brining and wet brining if you want more information. The important part to remember is your turkey will turn out juicier and more flavorful when dry brining.
Okay, now that we’ve covered why you should dry brine your turkey, let’s get into the how.
To dry brine a turkey you’ll need:
- a turkey that’s been spatchcocked. I typically do around a 14 pound turkey;
- about 6 tablespoons of kosher salt – I use Diamond Crystal brand, and I’ll tell you why in a second;
- a large cutting board;
- a rimmed sheet pan;
- a wire rack; and
- some foil.
You can also wear a pair of disposable gloves if you don’t want to touch raw meat, but it’s not necessary.
Before we get into the specific directions, there are a couple of tips I want to give you. The first tip is that you’ll want to clear room in your fridge for the turkey resting on the sheet pan. So enough space on the shelf for the sheet plan plus enough height for the turkey. If you defrosted your turkey in the fridge you probably already have some space, but you definitely want to do this before you begin dry brining your bird.
Next up I want to talk about salt. This dry brining method uses Diamond Crystal brand kosher salt, which is less salty by weight than other salts. I like to use it when cooking because it leaves a little more room for error when you’re salting your dishes. But, if you have a different brand of kosher salt you’ll need to adjust how much salt you use.
I recently discovered the website SaltYourMeat dot com, which is a dry brining calculator. You can select the type of meat, the weight, the type of salt you have, and what percentage of salt by weight that you want – which there are recommendations for – and it will tell you how much salt to use to dry brine your meat. So while I’m giving a recommendation for about 6 tablespoons of Diamond Crystal kosher salt for a 14 pound turkey, you can certainly adjust it depending on what salt you have, how big your turkey is, and how salty you like your meat. I’ll include a link to that site on the show notes page.
Okay, let’s get into dry brining specifics. First you’ll want to take your sheet pan and line it with foil, then insert the wire rack into it. Set it aside while you brine your turkey.
Next measure out your kosher salt into a small bowl. You’ll want to do this because you’ll be reaching back and forth between the salt and the raw turkey and you don’t want your hands to touch either the salt container or any of the other salt you’re not using and contaminating it. So measure it out and set it aside before you get going.
Place the turkey on the cutting board, if it’s not already there. Start at the head of the turkey and use your fingers to gently separate the skin of the turkey from the meat. You’ll want to do this for the breasts, legs, and thighs as best you can without poking a hole through the skin.
Once that’s done, take a pinch of salt in one hand and rub it onto the meat of the turkey under the skin. You’ll want to do this for as much of the meat as you can touch – any part that doesn’t get salt on it won’t be as flavorful as the salted parts. Use roughly half of the kosher salt on one half of the bird, and the other on the other half of the bird. If there’s a little remaining at the end, sprinkle it on top of the skin and on the underside of the turkey.
Set your turkey breast side up on the wire rack that’s in the sheet pan. You’ll need to get your turkey in the fridge to brine for at least 24 hours, but up to 72 hours. Ideally you want to leave it uncovered, but if that makes you nervous you can cover it lightly with a large piece of plastic wrap – just make sure air is still getting to it so the moisture doesn’t condense under it.
And that’s it! You have just dry brined your turkey! I have a post on my website, Hot Pan Kitchen, with pictures and the directions I just gave for how to dry brine a turkey if you’re more of a visual person. I’ll put a link to that post in the show notes page for this episode. To get to it you can either go to my main website at Hot Pan Kitchen dot com and click on podcast in the main menu, or you can click on the link provided in whatever podcast app you’re listening on.
If you enjoyed this episode, I would love it if you would subscribe to the show on your favorite podcast platform. And don’t miss out on the next episode in this turkey series, where I’m going to tell you how to smoke a turkey – it’s gives great flavor and also frees up your oven for other foods! So be sure and listen in for that.
That’s it for today, thank you so much for listening, and until next time, keep grilling like a mother.

Leave a comment